8:50
Folded Fabric Ornaments
Crouton Crackerjacks
Overview
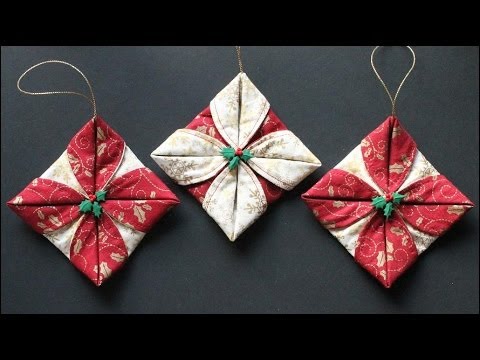
This video tutorial demonstrates how to create decorative folded fabric ornaments, perfect for last-minute gifts or seasonal decor. The process involves cutting coordinating fabric circles, sewing them together with a small opening for turning, pressing, and topstitching. The core technique involves folding the fabric circle into quarters and stitching the folded edges to create a unique, multi-pointed shape. Finally, the ornament is finished by attaching a hanging cord and optionally embellishing the center with a button or bead.
How was this?
Save this permanently with flashcards, quizzes, and AI chat
Chapters
- Select two semi-coordinating fabrics, one light and one dark, for contrast.
- Use a round object like a pan lid or plate (approximately 7.5 inches in diameter) to trace and cut two identical circles from the chosen fabrics.
- For best results, choose fabrics with small prints.
- Layer the two fabric circles with right sides together before sewing.
Precise fabric preparation ensures the final ornament will have a clean, symmetrical appearance and that the folding technique will work correctly.
Using a 7.5-inch diameter pan lid to trace and cut fabric circles.
- Sew the two fabric circles together using a 1/4-inch seam allowance, starting and ending with a backstitch.
- Leave an opening of about 1.5 inches along one edge to allow for turning the fabric right-side out.
- Carefully turn the fabric through the opening, using a chopstick or similar tool to gently push out the curves and ensure all seams are flat.
- Press the fabric flat if desired for a crisper finish.
Proper sewing and turning create the foundational 'pouch' for the ornament, ensuring it can be turned right-side out neatly and prepared for the next folding steps.
Using a chopstick to help turn the fabric pouch right-side out through the 1.5-inch opening.
- Fold the turned-out fabric circle in half, pressing the folded edge to create a crease.
- Turn under the raw edges of the 1.5-inch opening by about 1/4 inch to create a clean edge for topstitching.
- Topstitch around the entire edge of the fabric circle, about 1/8 inch from the edge, securing the opening and creating a finished look.
- Backstitch at the beginning and end of the topstitching to secure the seam.
These steps prepare the fabric circle for the unique folding technique by creating defined creases and a neat, stitched edge that will be hidden within the final ornament.
Turning under the 1/4-inch seam allowance along the opening before topstitching.
- Decide which fabric color will be the dominant outer color; this color will be folded inward.
- Fold the fabric circle in half, then fold it in half again to create four equal sections, pressing creases at each fold.
- Using a needle and thread, stitch through the creases on one side, then through the corresponding creases on the other side, pulling the fabric together.
- Secure the stitches by running the needle through the small opening at the base and tying off the thread.
This folding and stitching process is the core of the ornament's unique shape, transforming a flat circle into a dimensional, petal-like form.
Folding the circle in half twice to create four creases, then stitching through these creases to bring the points together.
- Gently flatten the stitched shape, ensuring the four points lay flat against the back.
- Turn the points outward to create the 'petals' of the ornament.
- Straighten and adjust the petals to ensure they are evenly spaced and lay flat.
- Thread a tapestry needle with a cord (about 8 inches) and insert it under one of the back corners, bringing it out through the center point.
- Tie a knot to secure the cord for hanging and optionally sew a button or bead to the center to cover the stitching and add decoration.
These final steps transform the folded fabric shape into a complete, decorative ornament ready for display or gifting, adding functional and aesthetic elements.
Sewing a holly leaf button onto the center of the ornament to cover the gathered points and add a festive touch.
Key takeaways
- Folded fabric ornaments are a quick and versatile craft project suitable for gifts.
- Using contrasting light and dark fabrics enhances the visual appeal of the folded design.
- Precise cutting and sewing are essential for a neat final product.
- The core technique involves creating creases by folding the fabric circle in half twice and stitching the folded edges together.
- Finishing touches like a hanging cord and a central embellishment complete the ornament.
- The resulting ornament resembles a stylized flower or a 'crab rangoon' shape.
Key terms
Fabric ornamentsCoordinating fabricsSeam allowanceBackstitchTurn inside outTopstitchCreaseTapestry needleEmbellishment
Test your understanding
- What is the purpose of leaving an opening when sewing the two fabric circles together?
- How does folding the fabric circle in half twice contribute to the final ornament shape?
- Why is it important to press the fabric circles and creases?
- What are some options for embellishing the center of the finished ornament?
- How can you ensure the fabric petals of the ornament are evenly spaced?